
If you want to create header in Elementor without touching a single line of code, you’re in the right place. A header is the first thing visitors see on your website, and it plays a huge role in navigation, branding, and first impressions. In this guide, you’ll learn exactly how to design and publish a custom Elementor header using Impact Template Builder — step by step.
Why You Need a Custom Create Header in Elementor
Most WordPress themes come with a fixed, one-size-fits-all header. That’s fine if you don’t mind a generic look, but if you want your logo, menu, search bar, and call-to-action button arranged your way, you need a header builder for Elementor that gives you full design freedom.
A well-built Elementor header template helps you:
- Keep branding consistent across every page
- Improve navigation and user experience
- Add custom buttons, icons, or a search bar
- Control exactly where the header appears (and where it doesn’t)
This is exactly what Impact Template Builder is designed for.
What You’ll Need Before You Start
- WordPress installed with Elementor (free or Pro)
- Impact Template Builder plugin installed and activated (see the installation guide if you haven’t set it up yet)
- A clear idea of what elements you want in your header — logo, menu, buttons, etc.
Step 1: Add a New Impact Pro Template
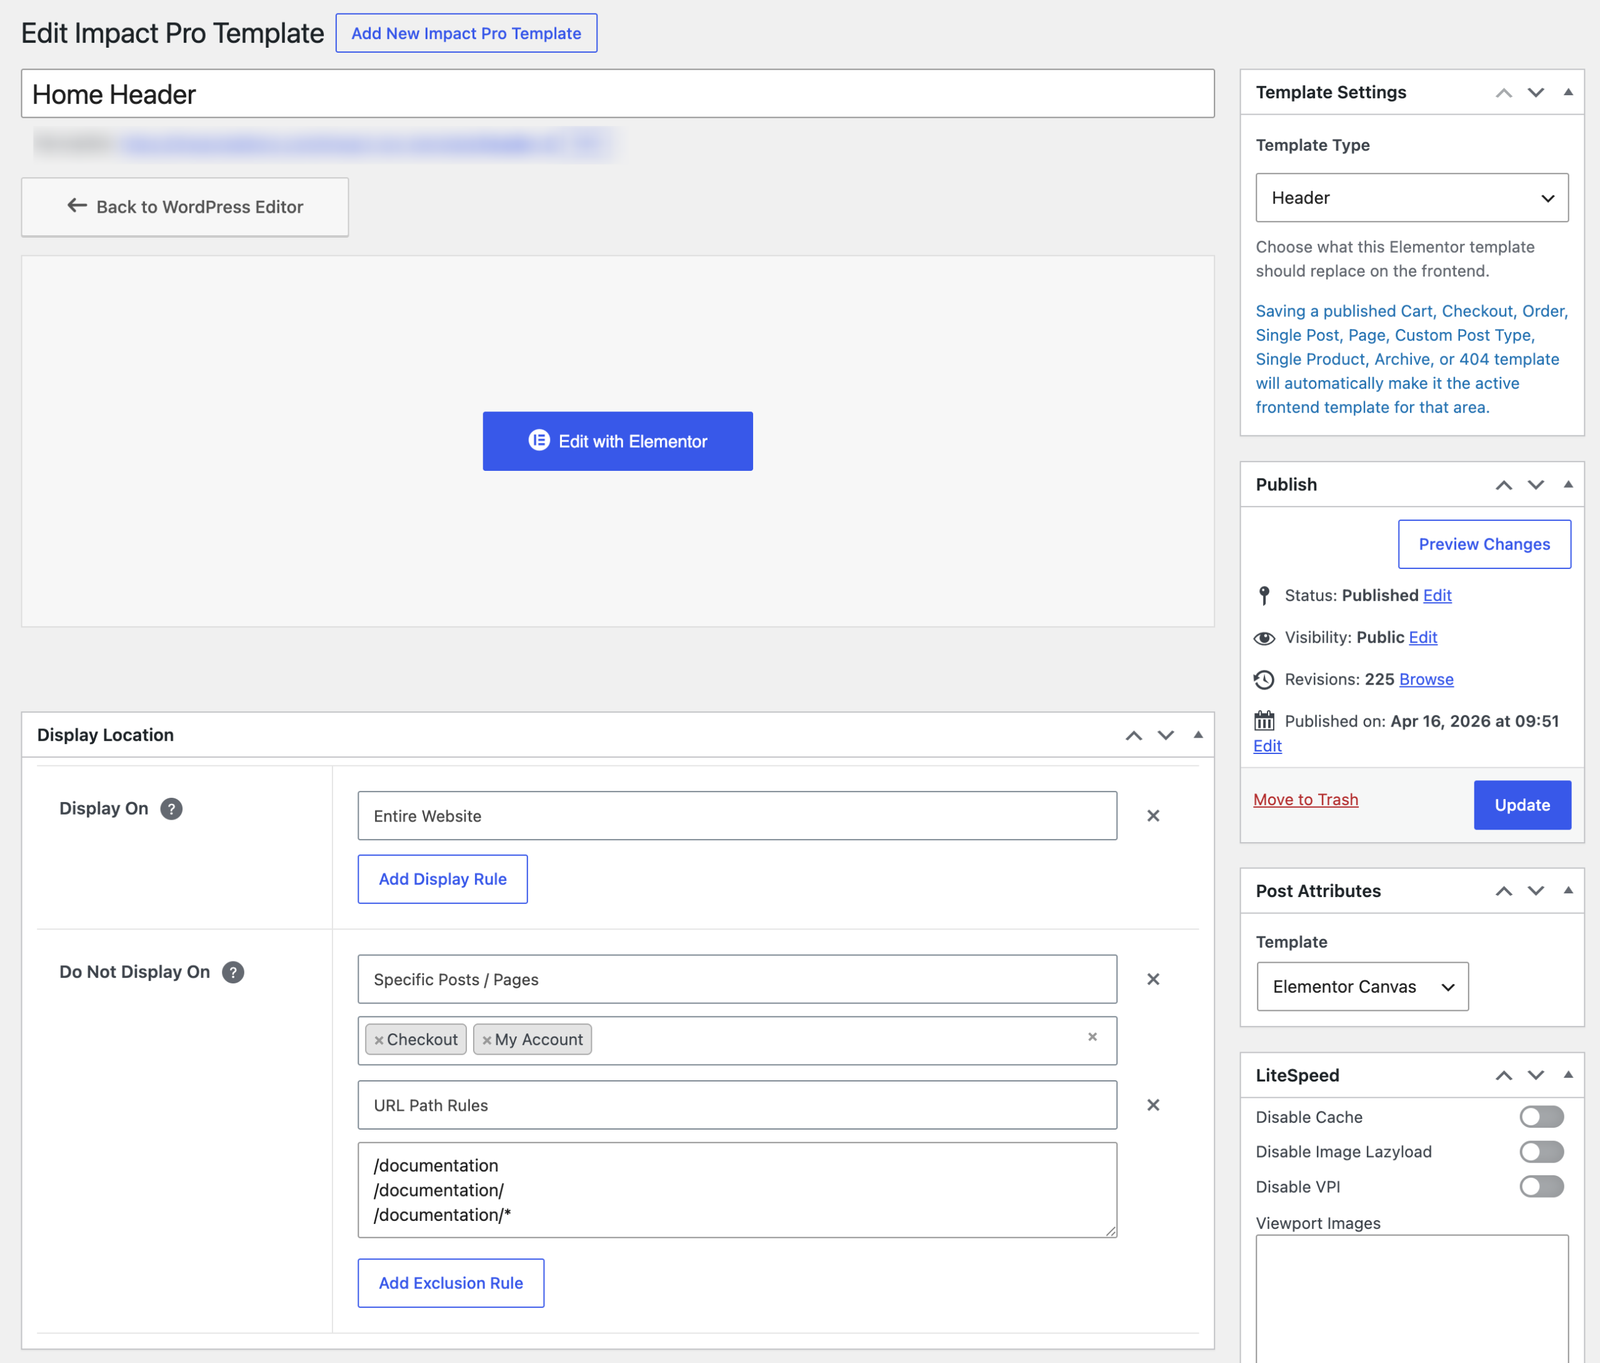
From your WordPress dashboard, go to Impact Pro Templates → Add New Impact Pro Template. Give your template a clear, recognizable name — for example, “Home Header” — so you can easily find it later if you’re managing multiple templates.
Step 2: Set the Template Type to “Header”
On the right-hand Template Settings panel, open the Template Type dropdown. You’ll see several options, including Header, Footer, WooCommerce Cart, WooCommerce Checkout, Single Post, and more. Select Header.
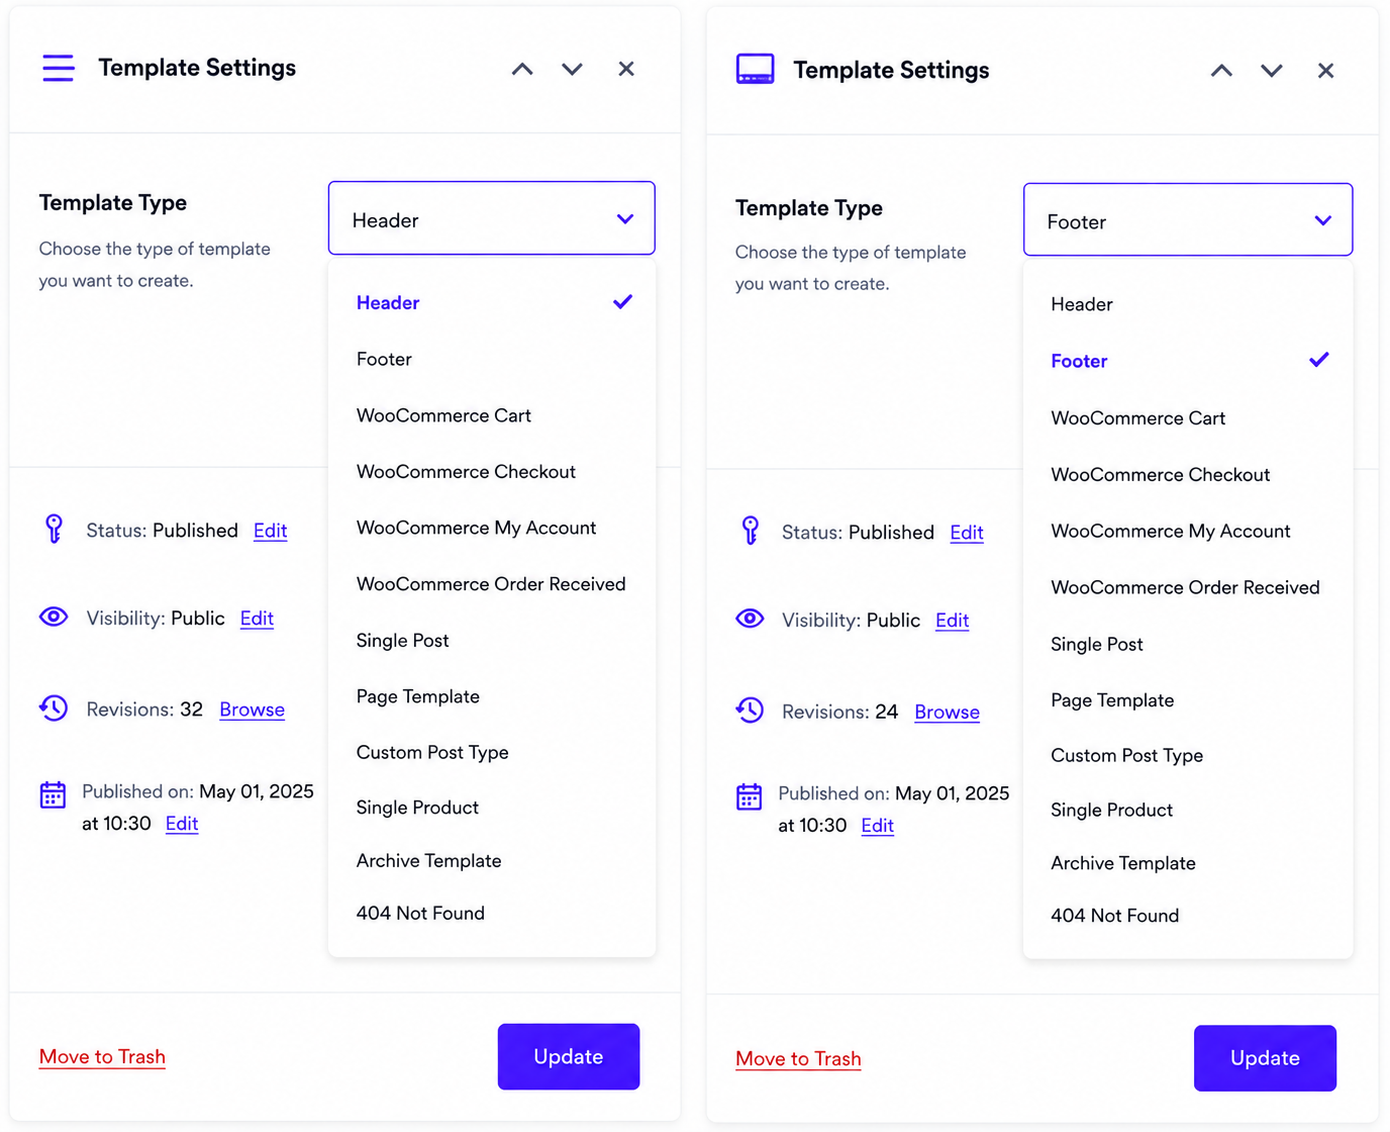
This tells the plugin that whatever you design next should replace your theme’s default header on the frontend — instantly turning your design into a working custom header in Elementor.
Step 3: Design Your Header with Elementor
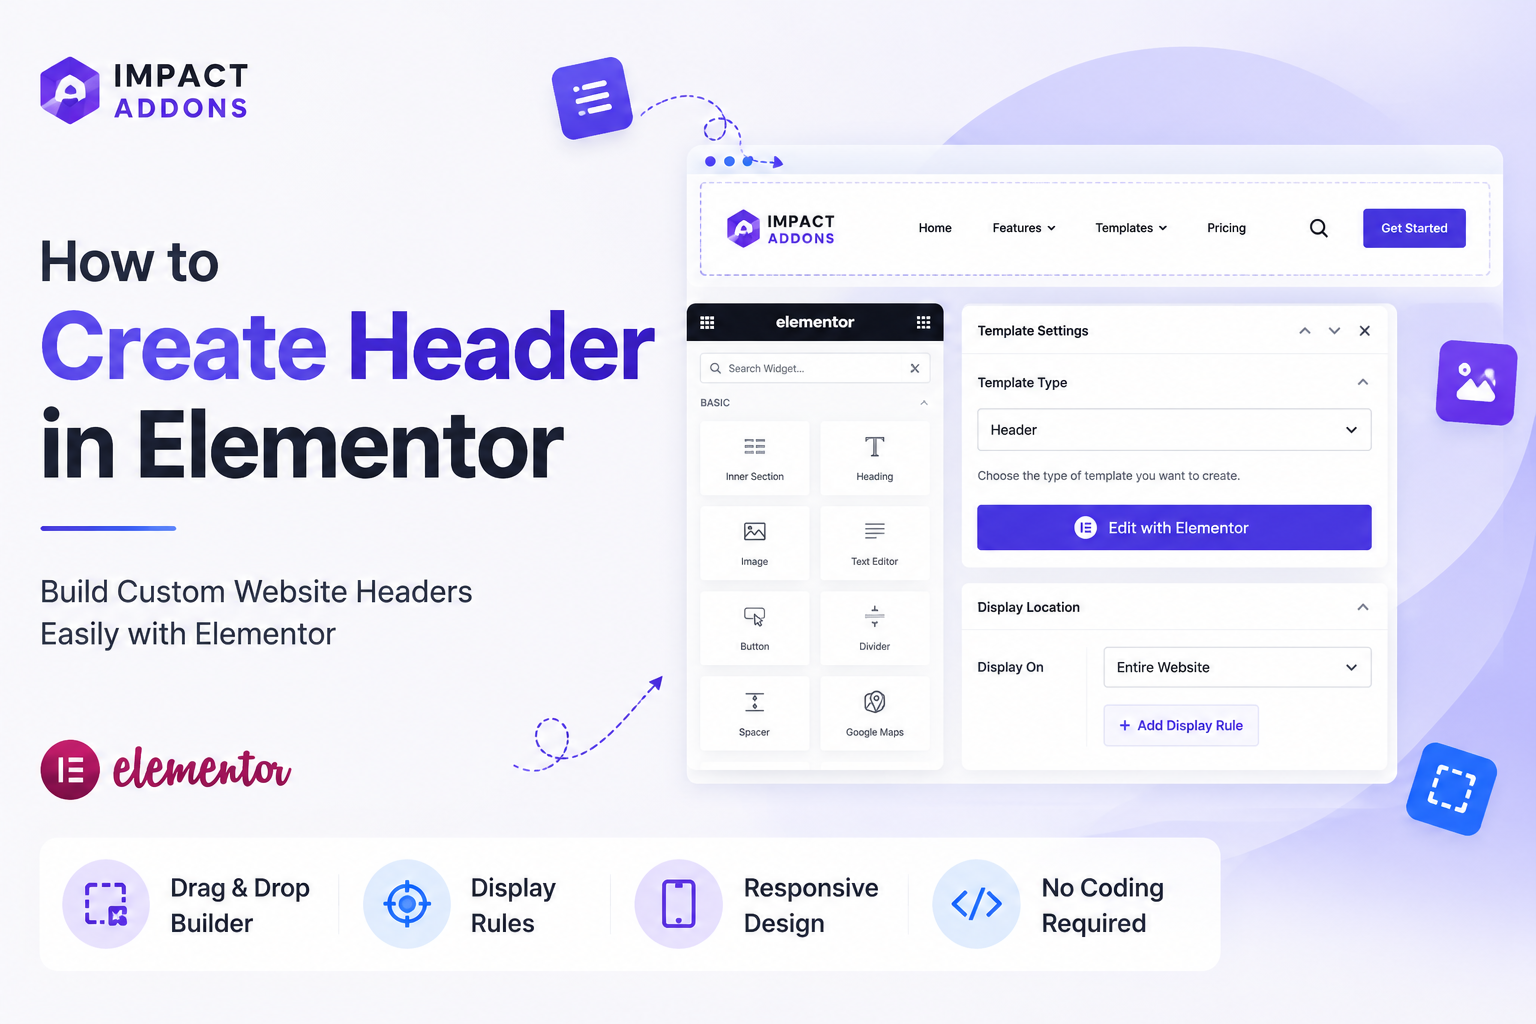
Click the Edit with Elementor button. This opens the standard Elementor editor, where you can drag and drop widgets to build your layout: logo, navigation menu, search icon, and a call-to-action button, just like the example below.

A typical header layout includes:
- Logo on the left
- Navigation menu in the center or right
- Search icon for quick access to content
- CTA button (like “Get Started”) to drive conversions
Since you’re using an actual Elementor header template rather than a theme’s built-in option, you can style every element — colors, spacing, fonts, hover effects — exactly the way you want.
Step 4: Set the Display Location
Scroll down to the Display Location section. Here you decide where your header should (and shouldn’t) appear:
- Display On: Choose “Entire Website” if you want this header everywhere, or add a specific rule to target certain pages only.
- Do Not Display On: Use this to exclude pages where you don’t want this header — for example, a checkout or landing page that needs a distraction-free layout. You can exclude by specific posts/pages or by URL path rules.
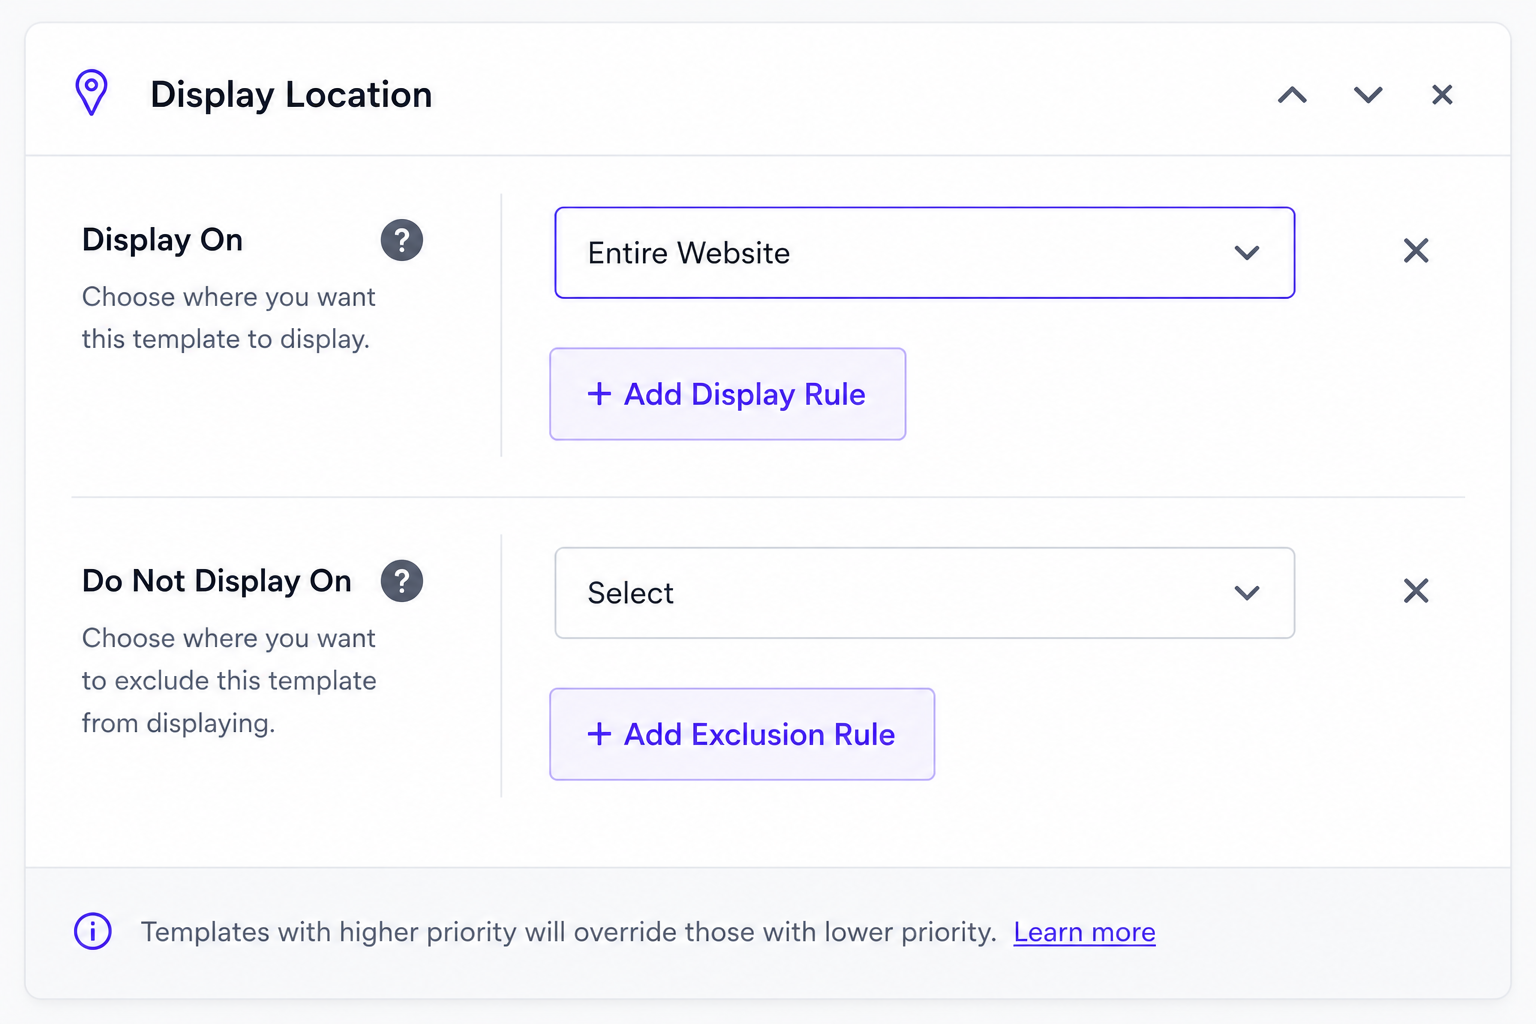
This flexibility is one of the biggest advantages of using a dedicated header builder for Elementor instead of relying on a theme’s single, fixed header.
Step 5: Publish and Preview
Once your design and display rules are set, click Update to publish the template. Elementor Template Builder will automatically apply it across your chosen pages. When editing, you’ll see a small “Header 1” tag in the preview, confirming which template is currently active — helpful if you’re managing multiple header variations for different sections of your site.
[Insert screenshot: Published header preview with “Header 1” label showing logo and navigation menu — Alt text: “custom header in Elementor published preview”]
Visit your website to confirm everything looks and functions as expected across desktop and mobile.
Tips for a Better Elementor Header Design
- Keep it lightweight — avoid overcrowding with too many widgets, which can slow load times.
- Make your CTA button visually distinct from the rest of the menu.
- Test your header on mobile view inside the Elementor editor before publishing.
- Use consistent brand colors and fonts across your header and footer for a cohesive look.
If you’d also like a matching footer, check out our guide on how to create custom headers and footers in Elementor.
Frequently Asked Questions
Can I create multiple headers for different pages?
Yes. With Impact Template Builder, you can create several header templates and use Display Location rules to control exactly which pages each one appears on.
Do I need Elementor Pro to build a custom header?
No. Impact Template Builder works with both the free and Pro versions of Elementor, giving you a proper Elementor header template system without requiring a Pro license.
Will my custom header slow down my site?
Not if built correctly. Keep your design clean, compress images, and avoid unnecessary widgets. You can learn more in the official Elementor performance documentation.
Can I hide my custom header on specific pages, like checkout or landing pages?
Yes. The Display Location settings let you exclude specific posts, pages, or even URL path patterns, so you can run a distraction-free layout wherever you need it.
Can I create a different header for WooCommerce pages?
Yes. Since the Template Type dropdown includes WooCommerce Cart, Checkout, and My Account, you can build separate headers (or hide the header entirely) for each of these pages using the same process.
What’s the difference between a theme’s built-in header and an Elementor header template?
A theme’s default header usually offers limited customization and applies site-wide with no exceptions. An Elementor header template built with Impact Template Builder gives you full design control plus page-level display rules, so you’re not locked into one layout for the whole site.
Do I need coding knowledge to build a custom header?
No. Everything is done visually inside the Elementor drag-and-drop editor — no HTML, CSS, or PHP required.
Useful Links
- Impact Template Builder — the plugin used in this guide
- How to Install Impact Template Builder — setup instructions
- Pricing Plans — compare free vs. pro features
- Full Documentation — detailed guides for every template type
- How to Create Custom Headers and Footers in Elementor — pair your header with a matching footer
- Contact Us — get help from our support team
- Submit a Feature Request — tell us what you’d like to see next
- Elementor Official Help Center — general Elementor documentation
Final Thoughts
Learning how to create header in Elementor the right way gives you complete control over your site’s first impression. With Impact Template Builder, you’re not limited to your theme’s defaults — you can design, style, and control exactly where your custom header appears, all without writing code.
Ready to get started? Explore Impact Template Builder or check the full documentation for advanced customization options. Have questions or a feature you’d like to see? Contact us or submit a feature request — we’d love to hear from you.