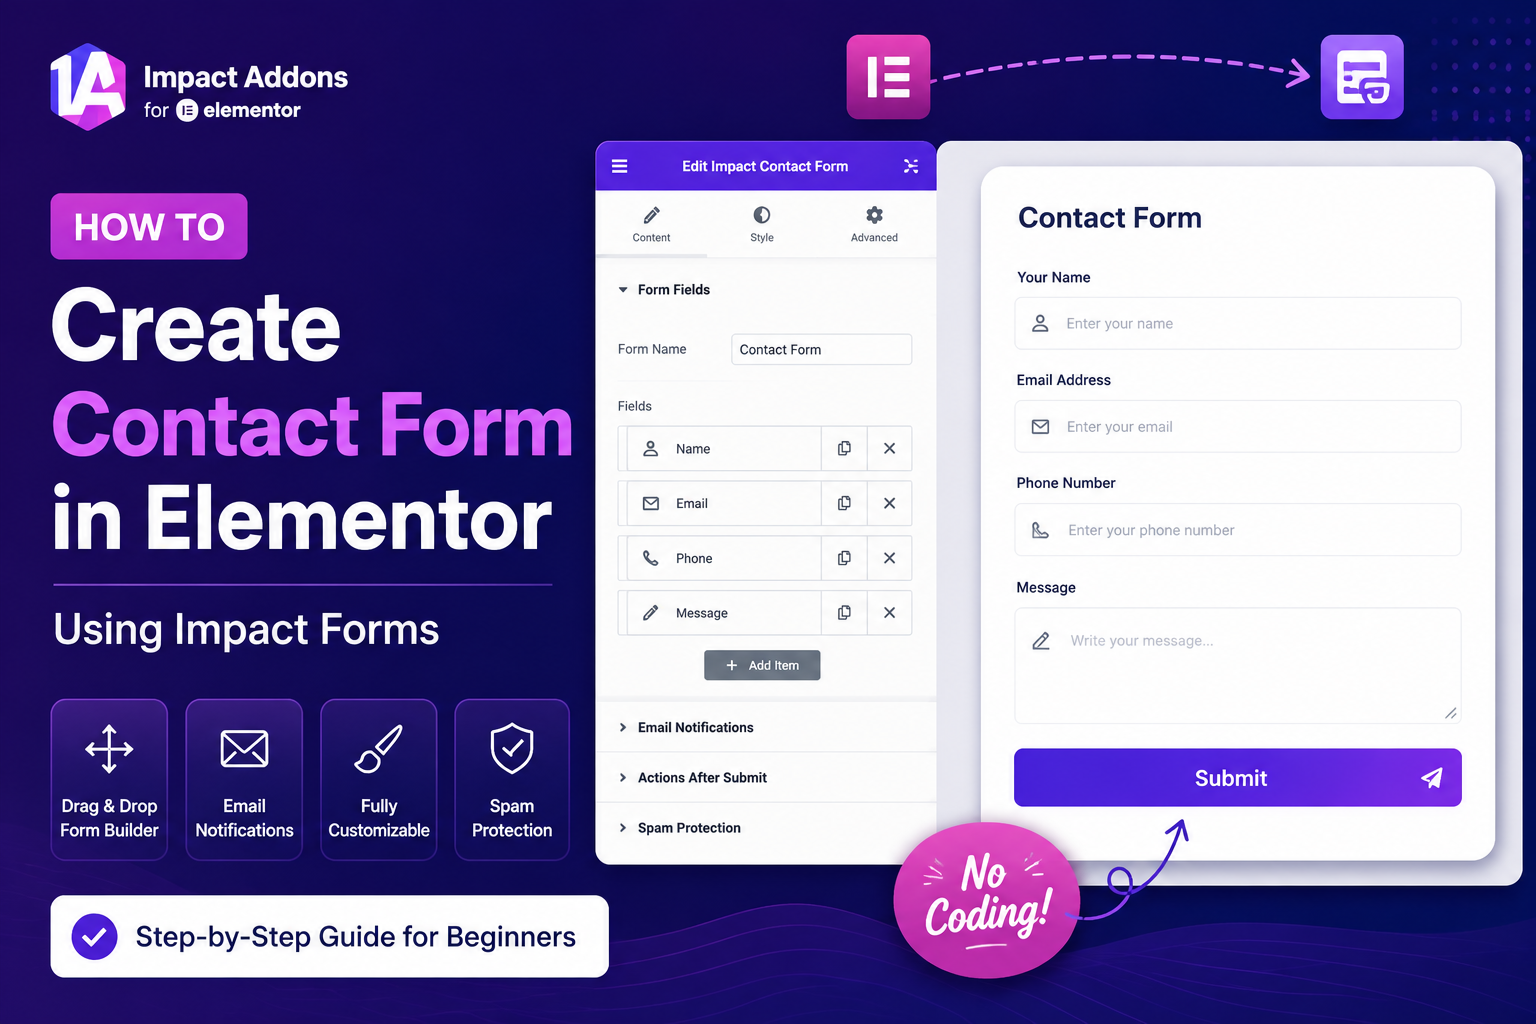
Create Contact Form in Elementor with Impact Forms, a powerful Elementor Form Builder that helps you build professional contact forms without writing code. Whether you need a simple inquiry form, support form, feedback form, or business contact form, Impact Forms provides a drag-and-drop interface, advanced field options, conditional logic, email notifications, and complete styling controls. In this guide, you’ll learn how to create a fully functional Elementor Contact Form step by step.
Step 1: Add the Impact Contact Form Widget: Add the Contact Form Widget
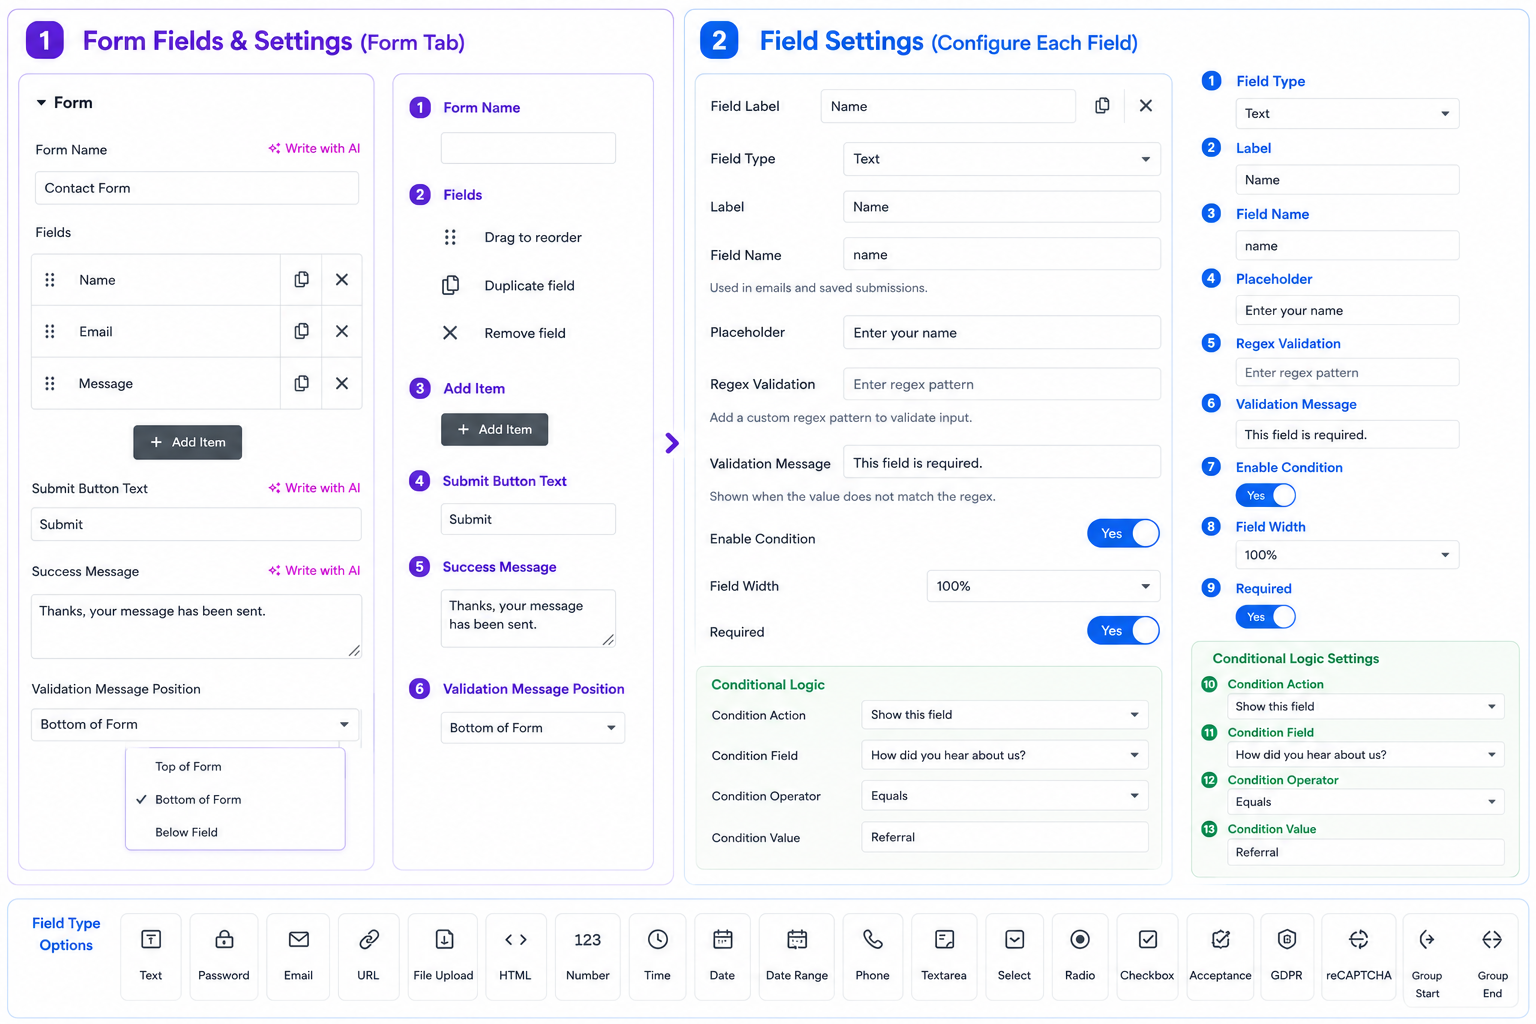
Start by editing your page with Elementor and drag the Impact Contact Form Widget onto your page.
From the Form tab, you can quickly build your contact form by:
- Entering a Form Name
- Adding or removing fields
- Reordering fields with drag-and-drop
- Duplicating existing fields
- Customizing the Submit Button text
- Editing the Success Message
- Choosing where Validation Messages appear
Each field includes its own configuration panel, allowing you to control every detail of your Contact Form Widget.
Available field settings include:
| Field Type | Field Label | Field Name |
|---|---|---|
| Placeholder Text | Regex Validation | Validation Message |
| Required Field | Field Width | Conditional Logic |
Impact Forms supports multiple field types including:
| Text | Password | URL | |
| Phone | Number | Time | Date |
| Date Range | Textarea | Select | Radio |
| Checkbox | Acceptance | GDPR | File Upload |
| HTML | Google reCAPTCHA | Group Start | Group End |
This flexibility allows you to build everything from a basic Elementor Contact Form to advanced business forms.
Step 2: Configure Email Notifications: Configure Email Notifications
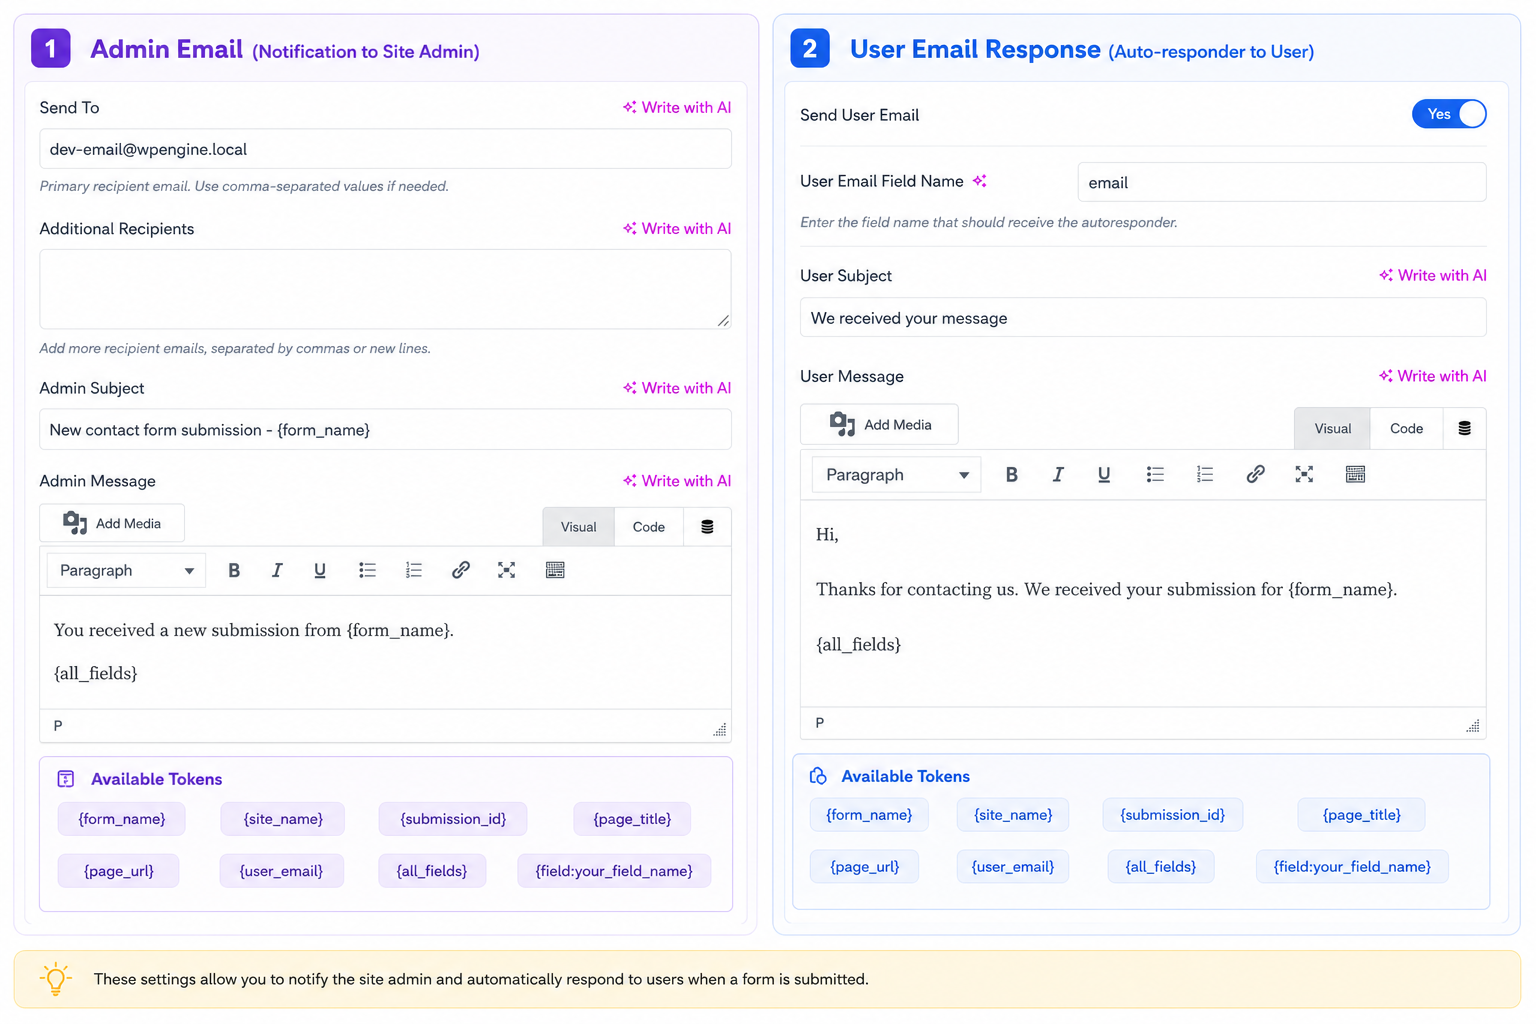
Once your fields are ready, configure how your form sends emails after every submission.
Impact Forms includes two separate notification systems.
Admin Email Notification
Every form submission can automatically notify your website administrator.
Configure:
- Primary Recipient
- Additional Recipients
- Email Subject
- Email Template
- Dynamic Tokens
Dynamic tokens automatically insert information like:
- Form Name
- Site Name
- Submission ID
- Page URL
- User Email
- All Submitted Fields
User Email Response
You can also send an automatic confirmation email to users immediately after they submit the form.
Customize:
- Enable User Email
- Email Field
- Email Subject
- Auto Response Message
- Rich Text Email Template
- Dynamic Tokens
This helps improve communication and provides users with instant confirmation that their message has been received.
Step 3: Customize Your Contact Form Design: Customize Your Contact Form Design
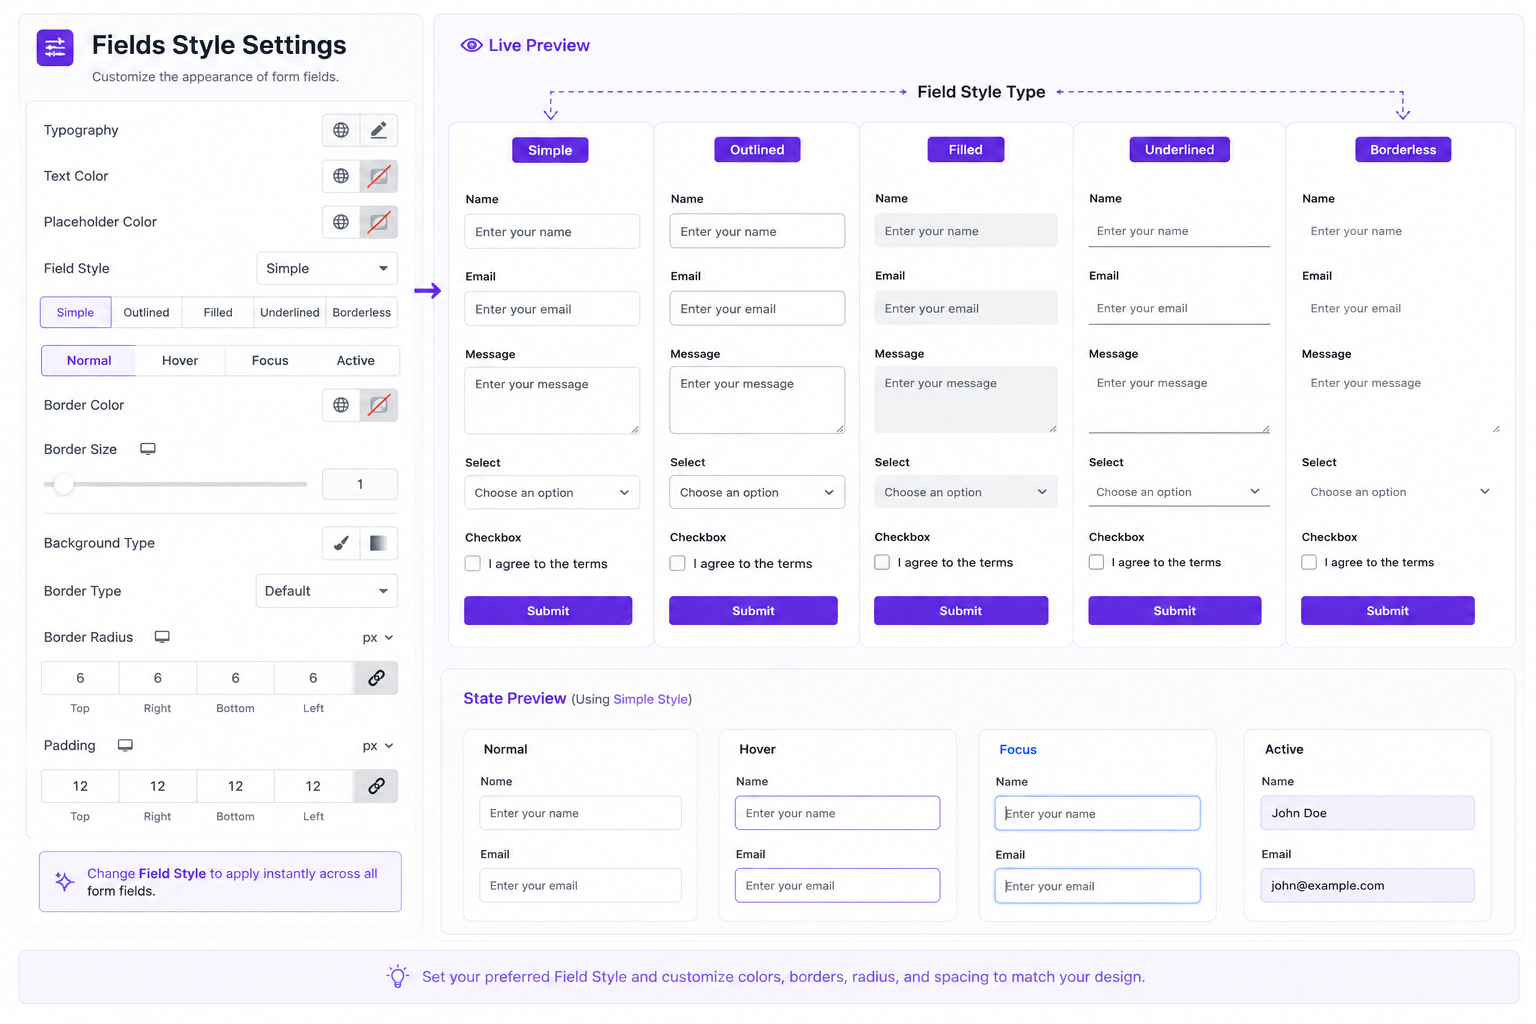
Impact Forms gives you complete design flexibility without custom CSS.
Choose from five built-in field styles:
- Simple
- Outlined
- Filled
- Underlined
- Borderless
You can customize:
- Typography
- Text Colors
- Placeholder Colors
- Border Colors
- Border Width
- Border Radius
- Background
- Padding
- Hover State
- Focus State
- Active State
The built-in Live Preview instantly shows how your selected field style looks before publishing the form.
Customize Form Layout
(Add Form Layout Screenshot)
The Form section lets you control the spacing and layout of your entire form.
Available options include:
- Columns Gap
- Responsive Layout Controls
- Field Alignment
- Better spacing between fields
These controls help create clean and professional form layouts for desktop, tablet, and mobile devices.
Configure Individual Form Fields
Every field can be customized independently.
Available settings include:
- Field Label
- Field Type
- Placeholder
- Field Name
- Validation Rules
- Required Field
- Field Width
- Conditional Logic
This makes the Elementor Form Builder flexible enough for simple contact forms and advanced business workflows.
Use Conditional Logic

Conditional Logic allows your Elementor Contact Form to display fields dynamically based on user input.
Available conditions include:
- Equals
- Does Not Equal
- Contains
- Is Empty
- Is Not Empty
You can also choose whether to:
- Show this Field
- Hide this Field
Conditional Logic helps create smarter forms while keeping the interface simple for visitors.
Customize Labels and Field Styles
Customize form labels with options like:
- Typography
- Color
- Margin
- Floating Label Offset
Style every field using:
- Typography
- Text Color
- Placeholder Color
- Background
- Border
- Radius
- Padding
- Hover State
- Focus State
- Active State
These styling controls help your Contact Form Widget perfectly match your website design.
Style Buttons and Validation Messages
Customize your submit button with:
- Typography
- Colors
- Border
- Border Radius
- Box Shadow
- Padding
Control validation messages by editing:
- Typography
- Error Color
- Error Border
- Error Spacing
This ensures users receive clear feedback whenever a required field is missing or invalid.
Customize Field Groups and Multi-Step Forms
Field Groups allow you to organize larger forms with better spacing and styling.
Customize:
- Background
- Borders
- Box Shadow
- Title Typography
- Description Typography
- Field Gap
- Header Gap
For multi-step forms, customize the progress indicator by changing:
- Step Gap
- Connector Width
- Label Typography
- Active Colors
- Number Circle
- Connector Line Style
- Active Connector Color
This makes long forms easier to complete while providing a better user experience.
Publish Your Elementor Contact Form
After configuring your form:
- Review all fields
- Test email notifications
- Preview your design
- Publish the page
Your professional Elementor Contact Form is now ready to collect inquiries, support requests, customer feedback, and business leads using Impact Forms.
Frequently Asked Questions
Can I create a contact form without coding?
Yes. Impact Forms lets you create a complete Elementor Contact Form using drag-and-drop controls without writing code.
Does Impact Forms support email notifications?
Yes. You can configure both administrator notifications and automatic user email responses.
Can I use Conditional Logic?
Yes. Impact Forms includes advanced Conditional Logic to show or hide fields based on user selections.
Can I customize every form field?
Yes. Every field supports custom labels, placeholders, validation, styling, spacing, colors, typography, borders, and responsive settings.
Does Impact Forms support Multi-Step Forms?
Yes. You can build professional multi-step forms with customizable progress indicators and navigation.
Continue Learning with Impact Forms
Congratulations! Your Elementor Contact Form is now ready to collect inquiries. With Impact Forms, you can continue building advanced forms such as registration forms, newsletter forms, support forms, and multi-step forms using the same intuitive form builder
Install Impact Forms
👉 https://impactaddons.com/install-impact-forms-for-elementor/
Impact Forms for Elementor
Discover all the features available in Impact Forms, including Contact Forms, Newsletter Forms, Signup Forms, Multi-Step Forms, Conditional Logic, Form Analytics, Submissions, and advanced styling options.
👉 https://impactaddons.com/impact-forms-for-elementor/
Documentation
Browse the complete documentation to learn how every widget, setting, and feature works with step-by-step tutorials.
👉 https://impactaddons.com/documentation/
Widget Library
Explore the complete collection of Elementor widgets included with Impact Addons to build better websites faster.
👉 https://impactaddons.com/widget-library/
Pricing & Elementor Bundle
Upgrade to Impact Forms Pro or choose the complete Elementor Bundle to access Impact Widgets, Impact Grid Addon, Impact Template Builder, and Impact Forms from a single license.
👉 https://impactaddons.com/pricing/
Need Help?
If you have questions or need assistance while creating your contact form, we’re here to help.
- 📖 Documentation: https://impactaddons.com/documentation/
- 💬 Contact Support: https://impactaddons.com/contact/
- 💡 Feature Request: https://impactaddons.com/feature-request/
- 📝 Changelog: https://impactaddons.com/impact-addons-changelog/