

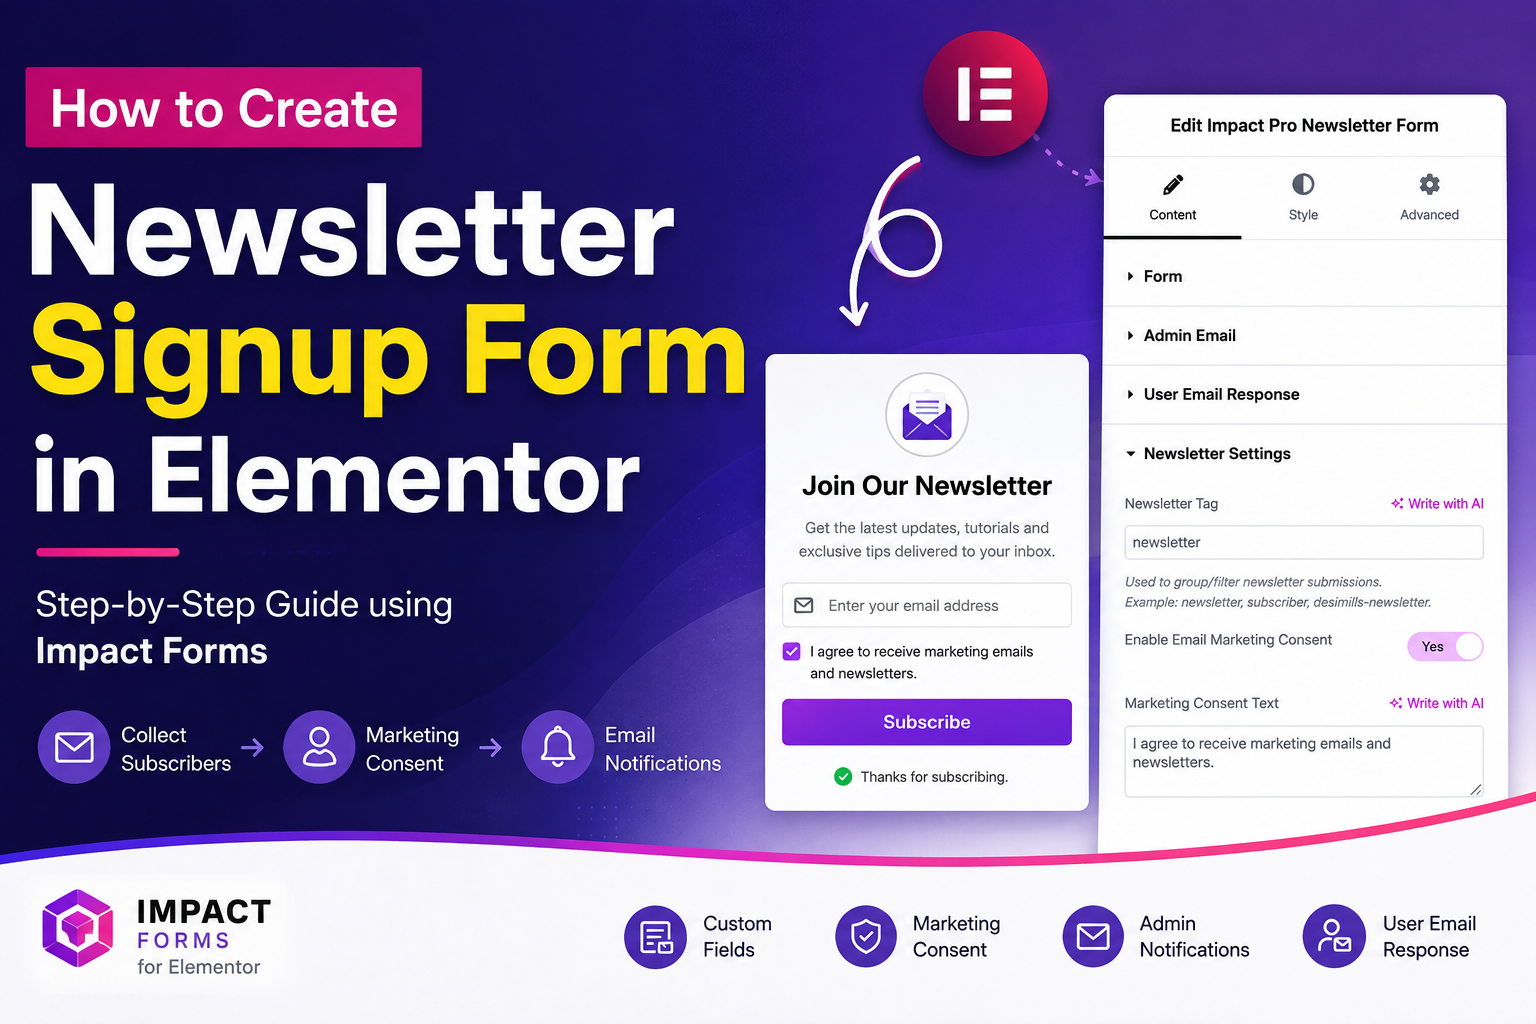
Newsletter Signup Form in Elementor is one of the easiest ways to collect email subscribers directly from your WordPress website. Whether you run a blog, business website, agency site, or WooCommerce store, a newsletter form helps turn visitors into subscribers you can reach again.
With Impact Forms for Elementor, you can build an Elementor newsletter form visually without writing code. You can configure form fields, marketing consent, admin notifications, subscriber email responses, success messages, and the complete design directly from Elementor.
In this tutorial, we’ll create a Newsletter Signup Form in Elementor step by step using the Impact Pro Newsletter Form widget.
Table of Contents
- Why Create a Newsletter Signup Form in Elementor?
- What You Need Before Starting
- Step 1: Add the Impact Pro Newsletter Form Widget
- Step 2: Configure the Newsletter Form
- Step 3: Configure Admin Email Notifications
- Step 4: Set Up the Subscriber Email Response
- Step 5: Configure Newsletter and Marketing Consent Settings
- Customize Your Elementor Newsletter Form
- Newsletter Signup Form Best Practices
- Frequently Asked Questions
Why Create a Newsletter Signup Form in Elementor?
A Newsletter Signup Form in Elementor gives visitors a simple way to join your email list without leaving your website. It is useful for sharing new articles, product announcements, tutorials, promotions, company updates, and other valuable content.
For example, a WordPress tutorial website can notify subscribers about new guides, while a WooCommerce store can use its WordPress newsletter form to collect subscribers interested in new products and promotions.
Using Impact Forms keeps the entire form-building workflow inside Elementor, making it easier to create an Elementor subscription form that matches the design of your website.
Explore Impact Forms for Elementor
What You Need Before Starting
Before creating your newsletter form, make sure your WordPress website has Elementor and Impact Forms installed and activated.
- WordPress website
- Elementor
- Impact Forms for Elementor
- A page where you want to collect subscribers
If you are new to Elementor, you can also visit the official
Elementor Help Center
to learn more about working with the Elementor editor and widgets.
Step 1: Add the Impact Pro Newsletter Form Widget
Open the page where you want to create your Newsletter Signup Form in Elementor and click Edit with Elementor.
Inside the Elementor widget panel, locate the Impact Pro Forms For Elementor section. Here you will see the available Impact Forms widgets, including:
- Impact Pro Contact Form
- Impact Pro Newsletter Form
- Impact Pro Signup Form
- Impact Pro Multi Step Form
- Impact Pro Profile Display
Drag the Impact Pro Newsletter Form widget into the section where you want your subscription form to appear.
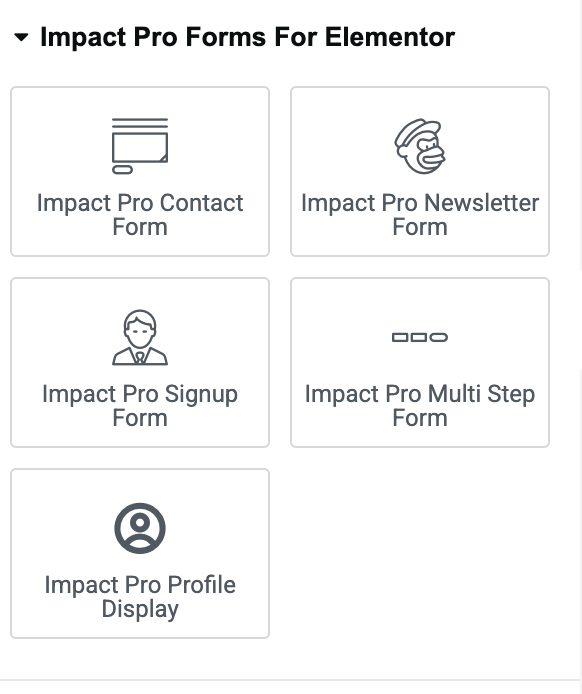
This dedicated newsletter form for Elementor provides newsletter-specific settings while keeping the familiar Elementor editing workflow.
Step 2: Configure the Newsletter Signup Form in Elementor
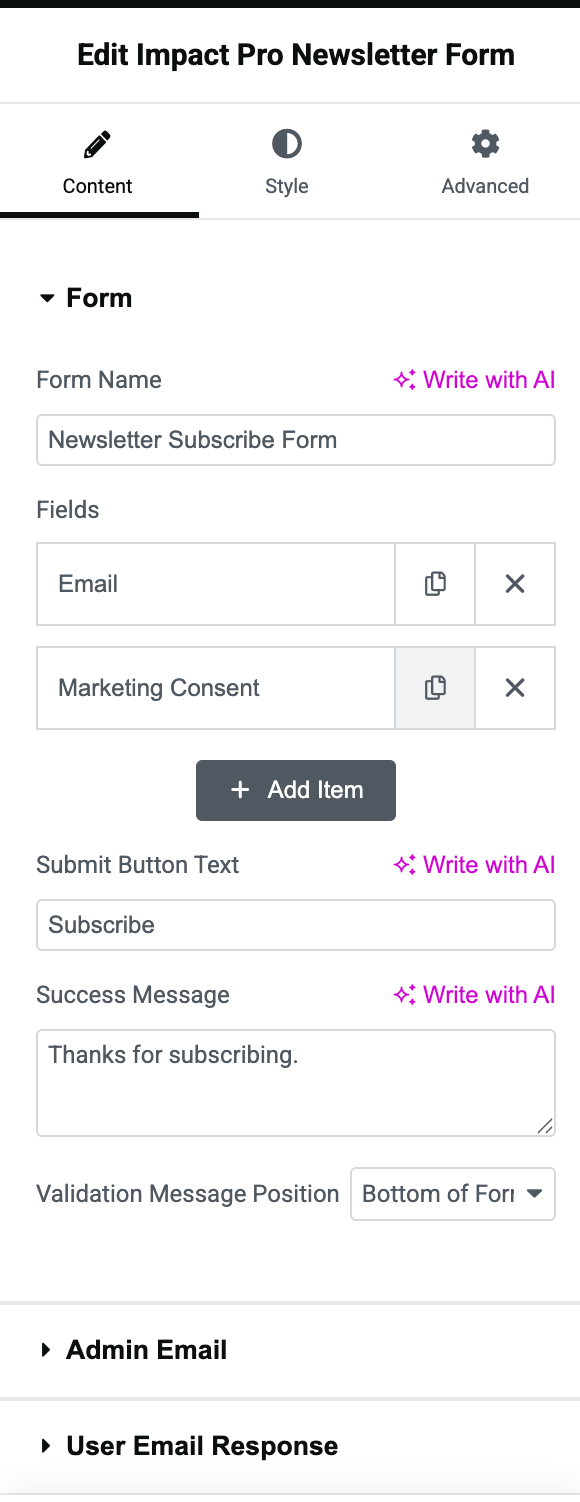
After adding the widget, open the Form section under the Content tab. This is where you configure the main structure of your Elementor newsletter form.
Set the Form Name
Enter a descriptive name such as Newsletter Subscribe Form. A clear form name makes the form easier to recognize and manage later.
Configure Newsletter Fields
The newsletter form can include the fields required for your subscription workflow. In our example, the form contains:
- Email – collects the subscriber’s email address.
- Marketing Consent – lets the visitor explicitly agree to receive marketing emails and newsletters.
You can use the Add Item button when additional fields are required.
Customize the Subscribe Button
Next, configure the Submit Button Text. For an email signup form Elementor visitors should immediately understand the action.
Good button labels include:
- Subscribe
- Subscribe Now
- Join Our Newsletter
- Get Updates
Set the Success Message
Use the Success Message option to tell subscribers that their form was submitted successfully. For example:
Thanks for subscribing.
You can also control the Validation Message Position to determine where validation feedback appears.
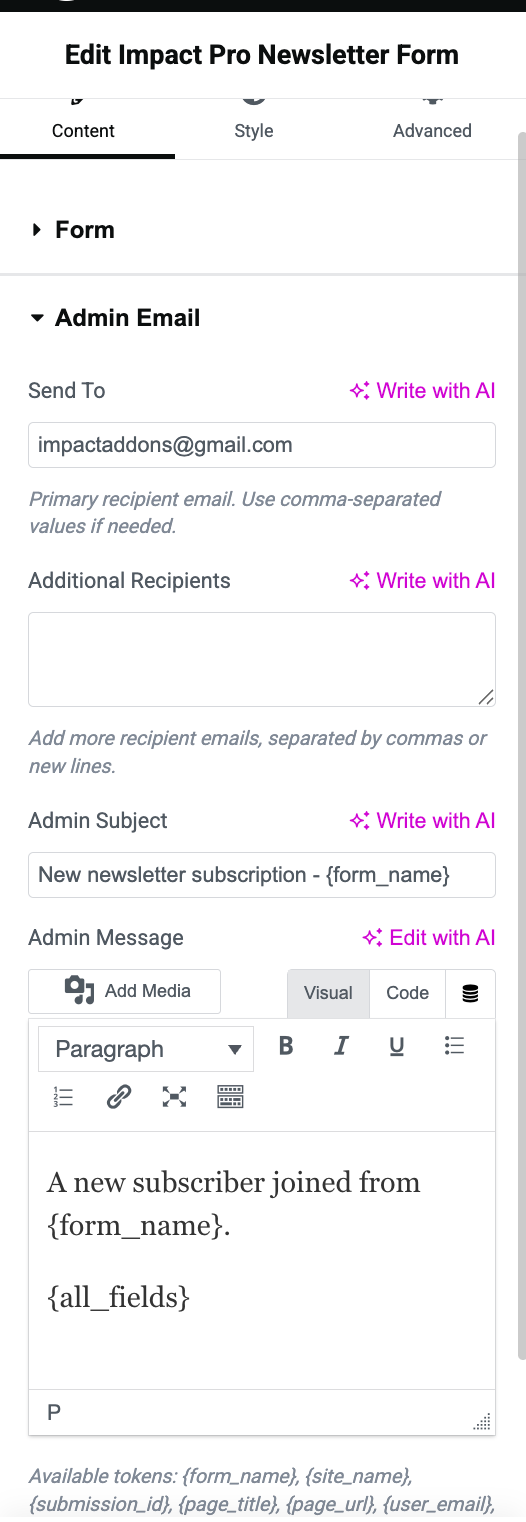
Step 3: Configure Admin Email Notifications
Your Newsletter Signup Form in Elementor can notify the website administrator when a visitor submits the newsletter form.
Open the Admin Email section.
Send To
Enter the primary email address where newsletter submission notifications should be delivered.
Additional Recipients
If multiple team members need notifications, add additional recipient email addresses. This can be useful when newsletter management is handled by a marketing or content team.
Admin Subject
Create a recognizable email subject. For example:
New newsletter subscription – {form_name}
Admin Message
The Admin Message controls the content sent to the administrator. Dynamic form tokens can be used to include information from the submission automatically.
This means you don’t have to repeatedly check the form manually just to know when a new newsletter subscription has been received.
Step 4: Set Up the Subscriber Email Response
A good WordPress newsletter form should also provide clear feedback to the person who subscribed.
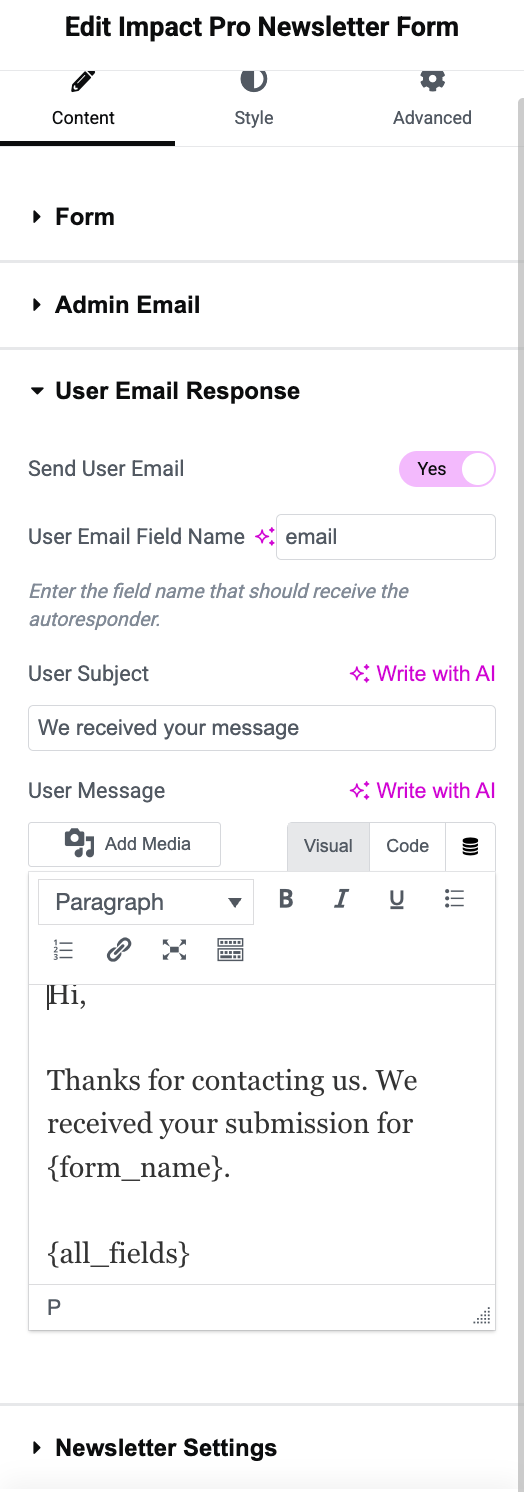
Open the User Email Response section.
Enable Send User Email
Turn Send User Email on when you want the subscriber to receive an automatic email after submitting the form.
User Email Field Name
Set the field that contains the subscriber’s email address. In a standard newsletter form, this will normally be the email field.
User Subject
Enter the subject line for the subscriber email. Instead of a generic message, you could use something specific such as:
Thanks for subscribing to our newsletter
User Message
Use the message editor to create the email subscribers receive after completing the form. You can add text and available dynamic information to create a more useful confirmation message.
Adding an automatic response makes your Elementor subscription form feel complete because visitors receive confirmation after submitting their information.
Step 5: Configure Newsletter and Marketing Consent Settings
Impact Forms includes dedicated newsletter settings for organizing subscriptions and handling marketing consent.
Open the Newsletter Settings section.
Newsletter Tag
Enter a newsletter tag such as newsletter. The tag can be used to group or filter newsletter submissions, making it easier to distinguish newsletter subscribers from other form submissions.
Enable Email Marketing Consent
Turn on Enable Email Marketing Consent when you want visitors to explicitly confirm that they agree to receive marketing emails.
This is particularly useful when your Newsletter Signup Form in Elementor is being used for promotional or marketing communication.
Marketing Consent Text
Enter a clear consent statement explaining what the subscriber is agreeing to receive.
For example:
I agree to receive marketing emails and newsletters.
Keep your consent language clear and make sure your newsletter process follows the privacy and email-marketing requirements that apply to your website and audience.
Customize Your Newsletter Signup Form in Elementor
Once the functionality is configured, open the Style tab to customize your Newsletter Signup Form in Elementor.
Depending on your design, you can customize the appearance of form elements so the newsletter section matches the rest of your website.
Pay particular attention to:
- Input field appearance
- Typography
- Text and placeholder readability
- Spacing
- Borders
- Subscribe button appearance
- Mobile responsiveness
The goal is to make the Elementor newsletter form look like a natural part of your website rather than an unrelated form added afterward.
Test Your Newsletter Form Before Publishing
Before publishing the page, test the complete subscription process yourself.
- Enter a valid email address.
- Review the marketing consent option.
- Submit the form.
- Confirm the success message appears.
- Check the administrator notification email.
- Check the subscriber email response if enabled.
- Test validation with an invalid or empty email address.
- Review the form on desktop, tablet, and mobile.
Testing the entire Newsletter Signup Form in Elementor workflow helps ensure visitors don’t encounter problems when they try to subscribe.
Best Practices for a Newsletter Signup Form in Elementor
Keep the Form Simple
For many newsletter forms, an email address and appropriate consent are enough. Avoid requesting information you don’t actually need.
Explain Why Visitors Should Subscribe
Don’t rely only on a “Newsletter” heading. Tell visitors what they will receive.
For example:
Get WordPress tutorials, Elementor tips, product updates, and useful resources delivered to your inbox.
Use Clear Button Text
Subscribe, Join Newsletter, or Get Updates communicates the action better than a generic Submit button.
Place the Form Where Visitors Can Find It
Common locations for an email signup form Elementor website include:
- Homepage
- Blog posts
- Website footer
- Landing pages
- Promotional sections
Optimize for Mobile
Use Elementor’s responsive controls to check your form on smaller screens. Fields should be readable and the subscribe button should remain easy to tap.
Build More Forms with Impact Forms for Elementor
Impact Forms isn’t limited to newsletters. The plugin also provides dedicated Elementor form widgets for other common website workflows.
You can use Impact Forms to build contact forms, signup forms, multi-step forms, newsletter forms, and profile-related experiences directly inside Elementor.
Learn More About Impact Forms for Elementor
You can also explore more tutorials and Elementor resources on the
Impact Addons Blog.
Frequently Asked Questions
How do I create a Newsletter Signup Form in Elementor?
You can create a Newsletter Signup Form in Elementor by adding the Impact Pro Newsletter Form widget to your Elementor page, configuring the email and marketing consent fields, setting your notification options, and customizing the form design.
Can I send an email to the subscriber after signup?
Yes. The User Email Response settings let you enable an automatic email response and configure the recipient field, subject, and message.
Can the administrator receive newsletter signup notifications?
Yes. The Admin Email settings allow you to configure a primary recipient, additional recipients, email subject, and admin message.
Can I add marketing consent to an Elementor newsletter form?
Yes. Impact Pro Newsletter Form includes an option to enable email marketing consent and configure your marketing consent text.
Can I organize different newsletter submissions?
The Newsletter Settings include a Newsletter Tag that can be used to group or filter newsletter submissions.
Final Thoughts
A Newsletter Signup Form in Elementor can help turn website visitors into subscribers while keeping the complete form-building experience inside Elementor.
With Impact Forms, you can configure newsletter fields, marketing consent, administrator notifications, subscriber email responses, success messages, and newsletter tags from one Elementor widget.
Keep your form simple, clearly explain why visitors should subscribe, configure your notifications, test the complete workflow, and make sure the design works well across different devices.
Ready to build your newsletter form?
Get Impact Forms for Elementor